Prior to the addition of the custom segments feature, NetSuite would provide basic segments like Classes, Location, Department, and Subsidiaries, but the user’s options were limited. However, the new custom segment feature allows users to create unlimited custom segments to easily create reports.With this feature, you can create a number of classifications such as Classes, Location, and Department without any limits! The rest of this post will help you learn how to enable Custom Segments and access its benefits.
To enable the Custom Segments feature, go to Setup > Company > Enable features > Suite Cloud > Suite GL. Mark the Custom Segments check box and then click Save. Next, to create Custom Segments, go to Customization > Lists, Records, and Fields > Custom Segments > New. See the image below to see what the Custom Segment Page looks like:

The label specifies the segment’s label when it appears on a record. Here, the basic segments -Class, Department, Location, and Subsidiary- cannot be used as labels.
There are two types of Custom Segments: ‘List/Record’ and ‘Multiple Select’. Using List/ Record a user can save only one selection whereas multiple selection can be saved using the Multiple Select option.
Multiple Select has the following limitations.
- The segment cannot have GL Impact
- The segment cannot be applied to transaction columns
- Dynamic defaulting cannot be configured for the segment
Once you enable the GL impact check box, the segments saved on transactions are displayed on the GL impact page. When the segment is then created, the value of the GL Impact option cannot be changed. Only administrators have access to change its value. Under the Permissions sub-tab, you can assign permissions to other roles for accessing Custom Segments.
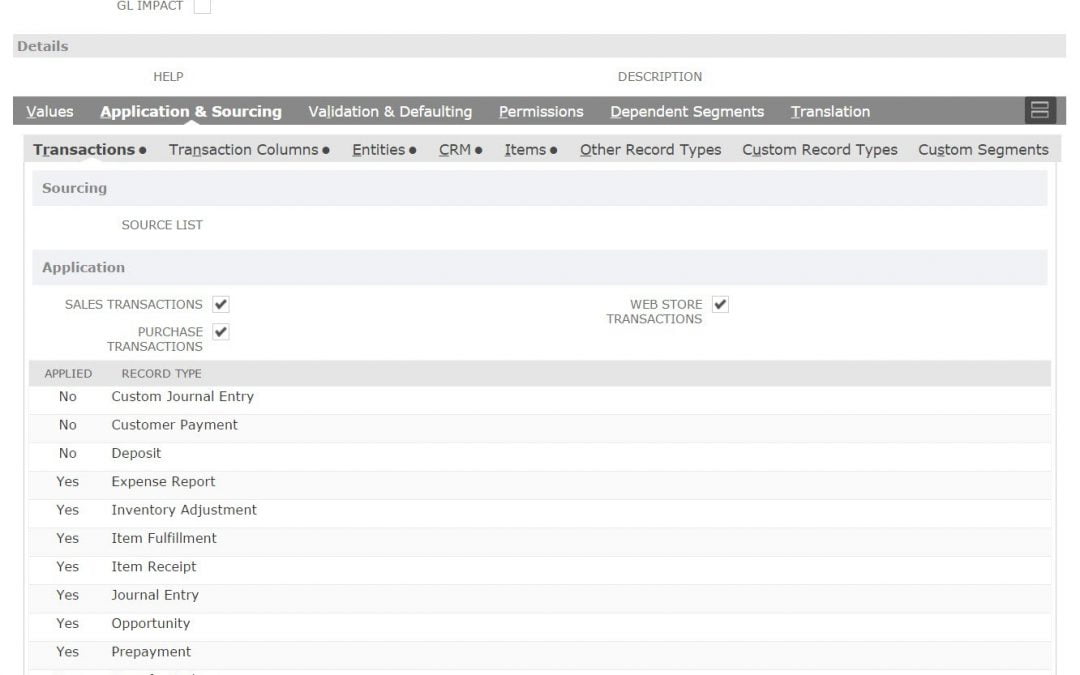
Custom Segments must be applied to records in order to use them, and they will appear as fields on the record they are applied to. Additionally, Custom Segments can be applied to groups of record types or added as columns in transaction sub-lists. These options can be selected under the Application and Sourcing sub-tab while creating the segments.
Under the Dependent Segments sub-tab, the list of segments having a relationship with that particular segment can be viewed, as shown below.

Hierarchical relationships can be created for Custom Segments’ values. Here, a value can be a parent to one or more other values. The relationships between the values can be viewed under the Values sub-tab. When the segment is available on a record, the parent-child relationships are denoted with a colon.

In addition, Custom Segments can be used as search filters and search columns in advanced searches to find records. In order to use a custom segment as a search filter or column, the user must have access to the edit level of the search or reporting access permission for that segment.
Using import assistant, the values for each custom segment created can be updated. Make sure that the import type is set to ‘Classification’ to import values. By default, only administrators have permission to import custom segment values. However, they can also grant access to other roles to import the values.

Benefits of Custom Segments
- Configure segment values to be hierarchical
- Configure a segment to default statically or dynamically
- Filter a segment’s values based on other segments
- Filter a segment’s values based on class, department, location, and subsidiary
- Configure a segment to appear on the GL impact page
- Create segments as multi-select fields
- Display segments selectively